Support

Knowledge Base  /  Frequently Asked Questions  /  Device ManageR (Legacy)

How To Discover AVTECH Devices With Device ManageR (VIDEO)

You may discover your “E” or “W” model Room Alert Monitor (not “S” models) using AVTECH’s Device ManageR software or AVTECH’s Device Discovery utility. Device ManageR can additionally discover Axis cameras on your network.

You may view a video demonstration of discovering your AVTECH devices with Device ManageR below:

Device ManageR scans your network in the following ways:

This FAQ shows you how to use Device ManageR to scan for your devices; please see our FAQ How To Discover AVTECH Devices With Device Discovery for information about Device Discovery.

Automatic Discovery With Device ManageR

Device ManageR runs in the background as a Windows service even when you don’t have it open in your browser. By default, it scans your network every 30 seconds using a broadcast on UDP Port 30718.

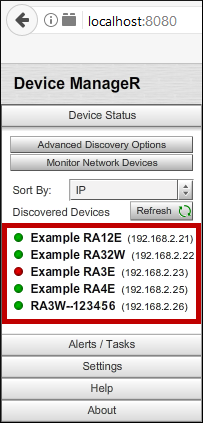
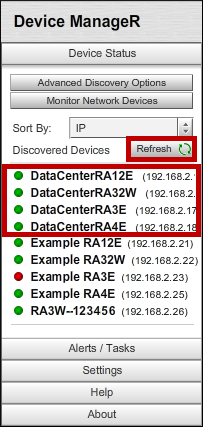
To see your automatically-discovered devices:

  1. Open Device ManageR in your browser. You may open it by entering ‘localhost:8080’ or ‘<IP address of host system>:8080’ in the address bar.
  2. Your devices will immediately populate the ‘Discovered Devices’ list to the left, as shown below:

If you wish, you may change automatic discovery settings, such as the scan interval, by navigating to Settings–> Discovery in the navigation bar to the left of your screen. 15 seconds is the shortest interval between automatic scans.

Advanced Discovery With Device ManageR

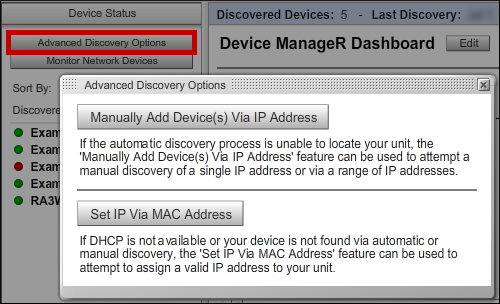
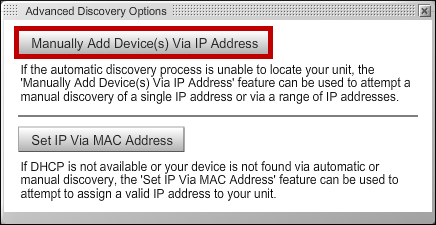
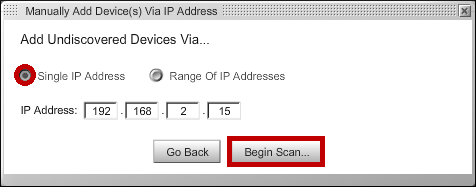
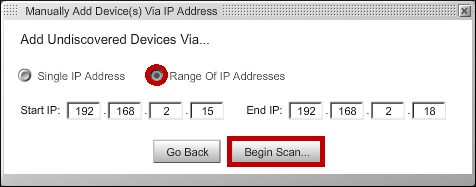
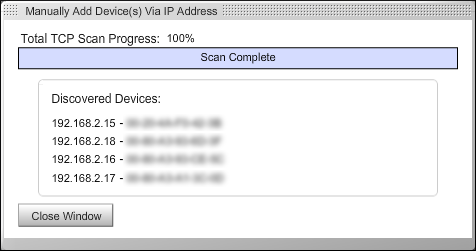
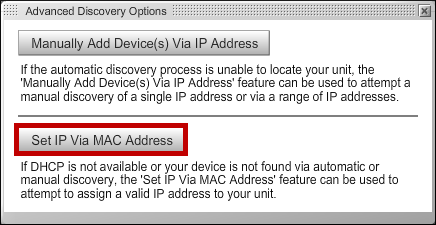
If your device does not appear with automatic discovery,* try using the advanced discovery feature, which searches over TCP instead of UDP.

* As of version 6.3.3, Device ManageR can discover Room Alert 3 Wi-Fi using Advanced Discovery. If you are unable to discover your Room Alert 3 Wi-Fi using Advanced Discovery, please check your Device ManageR version number. You may update to the latest version through your account at RoomAlert.com.

  1. Select Device Status –> Advanced Discovery in the navigation bar to the left of your screen to bring up the ‘Advanced Discovery Options’ dialog box.
  2. Next, select Manually Add Devices Via IP Address.
  3. When the ‘Add Undiscovered Devices Via . . .’ dialog box appears, you may choose Single IP Address or Range Of IP Addresses.
    • Single IP Address
      This is a good option when you already know the IP address of the device you’re looking for, but automatic discovery didn’t find it.
      • Leave the default, Single IP Address, selected.
      • In ‘IP Address,’ enter the IP address.
    • Range Of IP Addresses
      This is a good option when you’d like to search only a portion of your network for devices.
      • Select Range Of IP Addresses.
      • In ‘Start IP’ and ‘End IP,’ enter the first and last address in the range you’d like to look in.
  4. Select Begin Scan. Device ManageR then scans your network using TCP Port 30718.
  5. You’ll see a status popup that shows devices as they are found during the scan. (This popup has the option to stop the scan if you wish.)
  6. When the scan is complete, select Close Window.
  7. Finally, select Refresh in the navigation bar to the left of your screen to get the newly-discovered devices to populate the ‘Device Status’ list.
Discovery Using A MAC Address With AVTECH's Device ManageR

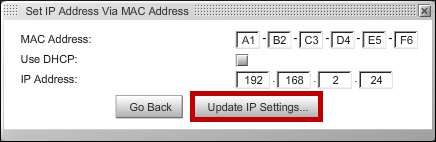
If your device does not appear with automatic or the above advanced discovery method, try setting an IP address using your device’s MAC address.*

*However, please note that the Room Alert 3 Wi-Fi model does not support discovery using its MAC address.

  1. Select Device Status –> Advanced Discovery in the navigation bar to the left of your screen to bring up the ‘Advanced Discovery Options’ dialog box.
  2. Next, select Set IP Via MAC Address.
  3. When the ‘Set IP Address Via MAC Address’ dialog box appears, enter the MAC address of your unit. Please see our FAQ, Where To Find The MAC Address Of A Room Alert, if you’re not sure of the MAC.
  4. Then, you may tell your device to use DHCP or you may assign it a static IP.
    • Select Use DHCP to have your unit obtain an address with DHCP.
      or
    • Enter an IP address to assign it a static address. Please note that this assigns only the IP; it does not assign the other necessary network settings of subnet mask, default gateway and DNS server.
  5. Select Update IP Settings.
  6. Your unit will reboot with its new settings (either DHCP or a static IP address) and should then appear in the list of discovered devices.
  7. If you entered a static IP in Step 4 (rather than choosing DHCP), open the Room Alert’s web interface and complete the IP settings for the subnet mask, default gateway and DNS server. Device ManageR does not set these for you during the discovery-via-MAC process. Please see this FAQ for instructions: How To Set A Static IP Address On Room Alert – Setting a static IP using Room Alert’s web interface.
Facebooktwitterredditpinterestlinkedinmail
Room Alert is Made in the USA, ships worldwide from our locations in the US and EU, and has been protecting facilities since 1988.

You may find Windows Command Prompt at the following path:

  • Windows 7 & 8
    Start--> All Programs--> Accessories--> Command Prompt
  • Windows 10
    Start--> All Apps--> Windows System--> Command Prompt

To run Windows Command Prompt as an administrator:

  • Windows 7 & 8
    Right-click on Command Prompt and select Run as administrator.
  • Windows 10
    Right-click on Command Prompt, select More and then select Run as administrator.

Example Polling Method Properties saved in Orion SolarWinds:

If you are using this client, you should configure the general SNMPv3 Credentials, but leave the Read / Write SNMPv3 Credentials section blank.

Room Alert Link- Supported Firmware Updates


Current S modelsCurrent E models
Room Alert 32SRoom Alert 32E
Room Alert 12SRoom Alert 12E
Room Alert 4E
Room Alert 3E

Room Alert Manager - Compatible Devices

The latest version of Room Alert Manager supports only the devices below.

It does not support any legacy Room Alert or TemPageR models.

Current S modelsCurrent E models
Room Alert 32SRoom Alert 32E
Room Alert 12SRoom Alert 12E
Room Alert 3SRoom Alert 4E
Room Alert 3E
Room Alert 3W

Current & Legacy Room Alert "E" & "W" Models

Current ModelsLegacy Models
Room Alert 32ERoom Alert 32W
Room Alert 12ERoom Alert 26W
Room Alert 4ERoom Alert 24E
Room Alert 3ERoom Alert 11E
Room Alert 3 Wi-FiRoom Alert 7E
TemPageR 4E
TemPageR 3E