
Knowledge Base / Frequently Asked Questions / Device ManageR (Legacy)
In an Action / Notification List, you choose the set and sequence of actions Device ManageR will take in response to alert conditions. You have the choice to set each action to start after a certain period of time and repeat at regular intervals. The most common action is to send an email notification; other available actions include Windows Shutdown, Linux Shutdown, Email An Axis Camera Snapshot, Toggle Signal Tower or Relay, and many more.
You may view a video demonstration of creating an Action / Notification List below:
Your Action / Notification Lists may include one or many actions. Grouping actions together in an Action / Notification List allows you to execute multiple actions in response to one alert condition. In this example, we’ll group the email actions we created in the previous FAQ, How To Configure An Action In Device ManageR, in order to notify multiple contacts when an alert occurs.
To create an Action / Notification List, follow these steps:
1. Open Device ManageR in your web browser. You may open it by entering ‘localhost:8080’ or ‘<IP address of Device ManageR’s host system>:8080’ in your browser’s address bar.
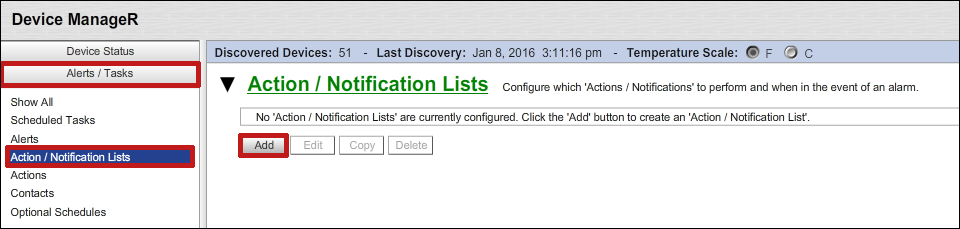
2. Select Alerts / Tasks in the navigation bar to the left.
3. In the Alerts / Tasks menu, select Action / Notification Lists.
4. Select Add to add your first Action / Notification List.
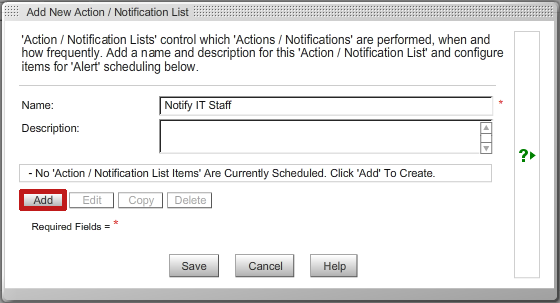
5. In the Add New Action / Notification List window that appears:
– In Name, enter a name for your Action / Notification List. In our example, we’re calling our list ‘Notify IT Staff.’
– (Optional) In Description, you may enter notes you feel may be helpful.
– Then select Add.
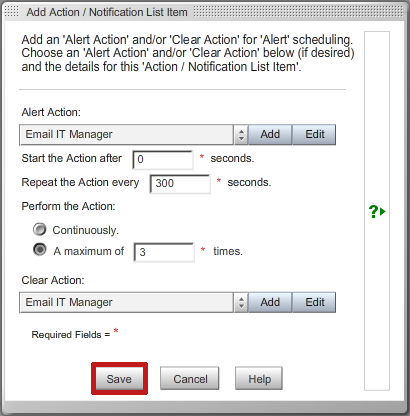
6. In the Add Action / Notification List Item window that appears:
– In Alert Action, select the action you want executed when the alert condition is triggered. In this example, we are selecting our Email IT Manager Action.
– In Start the Action after X seconds, you may leave the default, 0, to have the action begin immediately after the trigger, or enter a higher number of seconds to delay the start of the action. We’ve left the default of 0 in our example.
– In Repeat the Action every X seconds, you may leave the default, 60, or enter another value to control how frequently the action repeats. In our example, we’ve entered ‘300’ (seconds) in order to send emails at 5 minute intervals.
– In Perform the Action, you may leave the default, Continuously, or cap the number of times the action is performed by selecting A maximum of X times. You may leave the default of 1 or enter a higher value. In our example, we’ve capped the repetitions at 3.
– In Clear Action, you may select an action you have configured if you want that action performed when the Alert condition clears. In this case, we are selecting our Email IT Manager action so that contact receives a ‘clear’ notification.
– Select Save to save your Action / Notification List Item and return to the Add New Action Notification List window.
7. To add more Action / Notification List Items to your Action / Notification List, select Add again and repeat the steps above. You may add as many items to your list as you wish. In the example below, we’ve gathered into the ‘Notify IT Staff’ list the four email notification actions we set up in the previous FAQ, How To Configure An Action In Device ManageR.
8. When you are ready to save your Action / Notification List, select Save.

Once you’ve saved your Action / Notification List, the next step is to associate it with an alert. For more information, please see the next FAQ, How To Create An Alert In Device ManageR.
We'd love to talk with you about your monitoring needs. Contact one of our Product Specialists for a free consultation.


You may find Windows Command Prompt at the following path:
To run Windows Command Prompt as an administrator:

If you are using this client, you should configure the general SNMPv3 Credentials, but leave the Read / Write SNMPv3 Credentials section blank.
| Current S models | Current E models |
|---|---|
| Room Alert 32S | Room Alert 32E |
| Room Alert 12S | Room Alert 12E |
| Room Alert 3S | Room Alert 4E |
| Room Alert 3E | |
| S models | E & W models |
|---|---|
| Room Alert 32S | Room Alert 32E |
| Room Alert 12S | Room Alert 12E |
| Room Alert 3S | Room Alert 4E |
| Room Alert 3E | |
| Room Alert 3W |
| Model |
|---|
| Room Alert MAX |
| Room Alert 32S |
| Room Alert 12S |
| Room Alert 3S |
| Room Alert 32E/W |
| Room Alert 12E |
| Room Alert 4E |
| Room Alert 3E |
| Room Alert 3 Wi-Fi |
