Support

Knowledge Base  /  Frequently Asked Questions  /  Room Alert

How To Configure The Date & Time On Your Room Alert Monitor

Using an older version of the Room Alert Monitor web interface? Please click here for the appropriate FAQ.

By default, your Room Alert monitor obtains the date and time from an Internet NTP time server at time.nist.gov.

This means that in order to display the correct time, your Room Alert monitor must be able to:

  • connect to the internet, and
  • resolve the time server’s hostname

Alternatively, you may choose to configure your Room Alert monitor to use a time server on your local network.

For more information about configuring the date and time on your device, please see the tabs below.

Troubleshoot date & time issues

What is affected by your device’s date & time?

  • Your Room Alert monitor’s date & time is reflected in the device’s Status page (shown below) and within alert emails sent directly from the device.

Troubleshoot issues with the date & time

If your Room Alert monitor is displaying an incorrect date & time, please take the following troubleshooting steps.

  1. Open outbound UDP port 123 on anything on your network that stands between the Room Alert Monitor and NTP server.
  2. Set up a custom time server.
  3. Run a trace to capture additional information.
    • Our Tech Support team may ask you to capture a trace on your Room Alert monitor while the device attempts to sync to a time server. To run a trace on your device, please follow the instructions in our FAQ, How To Generate A Trace On A Room Alert Monitor.
Change your device's timezone or time format

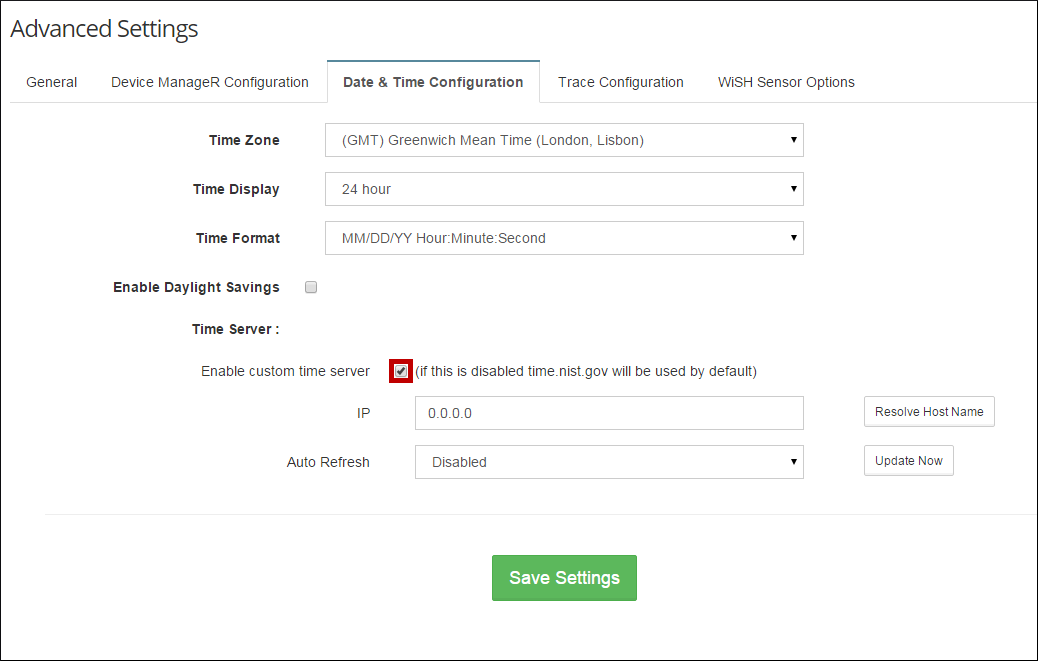
You may change your Room Alert monitor’s timezone, time format, and other date & time settings by following the instructions below:

  1. Open your Room Alert Monitor’s web interface.
  2. Select Settings in the navigation bar to the left.
  3. The select Advanced from the options below Settings.
    • On the Room Alert 3 Wi-Fi, navigate to the Alert Options –>  Advanced page.
  4. In the Advanced Settings page, navigate to Date & Time Configuration.
    • On Room Alert “E” models, this section is contained in its own tab.
    • Room Alert “S” models do not include separate tabs within the Advanced Settings page.
  • Below are the Date & Time Configuration settings shown at default. (This example is from a Room Alert “E” model.)
  1. In the Date & Time Configuration section, you may configure the following settings:
    • In Time Zone, you may choose your local time zone from the drop-down list.
    • In Time Display, you may choose the hour format from the drop-down list:
      • 24 hour (default)
      • AM/PM
    • In Time Format, you may select the date format from the drop-down menu:
      • MM/DD/YY Hour:Minute:Second (default)
      • DD/MM/YY Hour:Minute:Second
    • You may select the Daylight Savings check box to add 1 hour to the current time.
    • In Auto Refresh, you may select the interval at which your unit synchronizes with the timeserver:
      • Disabled (“E” models only)
      • 10 Minutes
      • 1 Hour
      • 6 Hours
      • 12 Hours
      • 24 Hours
    • For information about configuring a custom time server, please see the “Use a custom time server” tab in this FAQ.
  1. After you’re done making changes, select Save Settings at the top or bottom of the screen. Your Room Alert Monitor will reboot with the new settings applied.
Use a custom time server

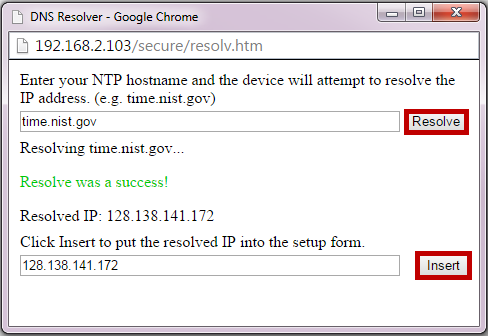
If you wish, you may configure your Room Alert Monitor to obtain the date and time from an NTP time server on your local network by following the instructions below.

  1. Open your Room Alert Monitor’s web interface.
  2. Select Settings in the navigation bar to the left.
  3. The select Advanced from the options below Settings.
    • On the Room Alert 3 Wi-Fi, navigate to the Alert Options –>  Advanced page.
  4. In the Advanced Settings page, navigate to Date & Time Configuration.
    • On Room Alert “E” models, this section is contained in its own tab.
    • Room Alert “S” models do not include separate tabs within the Advanced Settings page.
  5. In the Date & Time Configuration section, select the check box to use a custom time server.
    Date & Time Configuration page -- custom
  6. Then enter the address for your time server.
    • Room Alert “S” models only: You may enter either the IP address or host name for your time server.
    • Room Alert “E” models only: If you do not know the IP address of the time server, you may select Resolve Host Name and follow the instructions in the DNS Resolver dialog box.
    • Room Alert 3Wi-Fi: You must enter the IP address of your time server.
  7. “E” models only: You may select Update Now to synchronize the time manually.
    • You may also do this by entering http://<IP of your unit >/cmd.cgi?action=SyncTime in your browser address bar.
  8. Select Save Settings at the top or bottom of the screen. Your Room Alert Monitor will reboot with the new settings and attempt to obtain the time and date from the new IP address.

If you’d like to configure a Windows system or Windows server as a Network Time Server, please see this FAQ: How To Configure A Windows Or Windows Server System As A Network Time Server (NTP).

Facebooktwitterredditpinterestlinkedinmail
Room Alert is Made in the USA, ships worldwide from our locations in the US and EU, and has been protecting facilities since 1988.

You may find Windows Command Prompt at the following path:

  • Windows 7 & 8
    Start--> All Programs--> Accessories--> Command Prompt
  • Windows 10
    Start--> All Apps--> Windows System--> Command Prompt

To run Windows Command Prompt as an administrator:

  • Windows 7 & 8
    Right-click on Command Prompt and select Run as administrator.
  • Windows 10
    Right-click on Command Prompt, select More and then select Run as administrator.

Example Polling Method Properties saved in Orion SolarWinds:

If you are using this client, you should configure the general SNMPv3 Credentials, but leave the Read / Write SNMPv3 Credentials section blank.

Room Alert Link- Supported Firmware Updates


Current S modelsCurrent E models
Room Alert 32SRoom Alert 32E
Room Alert 12SRoom Alert 12E
Room Alert 4E
Room Alert 3E

Room Alert Manager - Compatible Devices

The latest version of Room Alert Manager supports only the devices below.

It does not support any legacy Room Alert or TemPageR models.

Current S modelsCurrent E models
Room Alert 32SRoom Alert 32E
Room Alert 12SRoom Alert 12E
Room Alert 3SRoom Alert 4E
Room Alert 3E
Room Alert 3W