Knowledge Base / Frequently Asked Questions / Device ManageR (Legacy)
The Report Generator Plugin allows you to periodically send an automatic email to a configured contact with status updates on discovered devices and detected alerts.
You may watch a video demonstration of setting up reports as scheduled tasks below:
Before you attempt to create a report, first download and install the Report Generator Plugin from your account at RoomAlert.com.
To configure a report in Device ManageR, follow these steps:
1.Set up your mail server in Settings–>SMTP Email. For instructions, please see How To Set Up Email In Device ManageR (VIDEO). If your mail server is Gmail, see this FAQ for additional information: How To Use Gmail As A Mail Server In Device ManageR.
2. Set up your Contacts in Alerts/Tasks–>Contacts. For instructions, please see How To Create And Edit Contacts In Device ManageR.
3. Set up a ‘Send Email Report to Configured Contact’ Action in Alerts/Tasks–>Actions. For instructions, please see How To Configure An Action In Device ManageR.
A. In the example below, we named our action “Send Report To Network Admin.”
B. For Action Type, select Send Email Report To Configured Contact from the drop-down menu.
C. Options unique to the Report Generator Plugin will appear.
D. Select the Contact you created in Step 2.
E. Both the Email Subject and Email Body fields can be edited using the keywords provided by the Report Generator Plugin. To edit, place your cursor in the field at the spot you want to insert the keyword. The Click To Insert A Keyword button will appear.
F. Select Click To Insert A Keyword to open the Insert Keyword window.
G. In the Insert Keyword window, select the appropriate keyword.
– There are two tabs of keywords in this window. The Alerting keywords can only be used when configuring an Alert. The Reporting keywords can be used when configuring Alerts or Reports.
– If you are creating a Report Generator Action that will be used with the Scheduled Tasks, only select keywords from the Reporting tab.
4. Configure a schedule in Alerts/Tasks–> Optional Schedules. For instructions, please see How To Configure Schedules in Device ManageR.
– In this example, we named our schedule “Sunday – Saturday 12:00 PM” and set it to every day at noon.
5. Configure a scheduled task in Alerts/Tasks–> Scheduled Tasks.
A. Select Add to open the Add New Scheduled Task window.
B. Name your Scheduled Task. In this example, we named our schedule “Daily Reports at Noon.”
C. Select the Schedule you created for this Task.
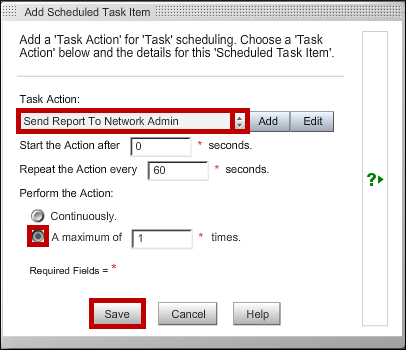
D. Select Add to open the Add Scheduled Task Item window.
E. Select the Action you configured in Step 3 from the drop down menu in the Task Action box.
F. Set the Perform the Action setting to “A maximum of 1 time,” by selecting the radio button beside the option.
G. Select Save to Save the Scheduled Task item and return to the Add New Scheduled Task window.

H. In the Add New Scheduled Task window, select Save to save this Scheduled Task.

You may find Windows Command Prompt at the following path:
To run Windows Command Prompt as an administrator:
| Current S models | Current E models |
|---|---|
| Room Alert 32S | Room Alert 32E |
| Room Alert 12S | Room Alert 12E |
| Room Alert 3S | Room Alert 4E |
| Room Alert 3E | |
| S models | E & W models |
|---|---|
| Room Alert 32S | Room Alert 32E |
| Room Alert 12S | Room Alert 12E |
| Room Alert 3S | Room Alert 4E |
| Room Alert 3E | |
| Room Alert 3W |
| Model |
|---|
| Room Alert MAX |
| Room Alert 32S |
| Room Alert 12S |
| Room Alert 3S |
| Room Alert 32E/W |
| Room Alert 12E |
| Room Alert 4E |
| Room Alert 3E |
| Room Alert 3 Wi-Fi |