Support

Knowledge Base  /  Frequently Asked Questions  /  Room Alert

How To Configure Light Tower Or Relay Alarm Profiles In Your Room Alert Monitor

You may use Alarm Profiles in your Room Alert Monitor to automatically turn on and off your Light Tower (LEDs and audio) or Relays on boot or in response to alarm conditions.

Controlling Light Towers or Relays with Room Alert Manager

If you’re working with a Room Alert S model or one of our current Room Alert E models, you may instead set up alarms for your Light Tower or Relay through the Room Alert Manager software if you wish. To do so, please see our FAQ, How To Configure Light And Relay Actions In Room Alert Manager.

  • If you want to trigger the Light Tower or Relay on one Room Alert from a sensor on another Room Alert, you must use Room Alert Manager.
  • However, if you want your Light Tower or Relay to do something when the attached device reboots, you must configure that through the Room Alert.

Setting Up Profiles In Your Room Alert’s Web Interface

To set up profiles in your Room Alert’s web interface, please follow these steps:

Step 1: Enable your External Light Tower or Relay Switch.

You must first enable your Light Tower or Relay Switch in the Room Alert web interface. For instructions, please see How To Enable Your External Light Tower Or Relay Switch In Your Room Alert Monitor.

At the end of those instructions, you may select Save to reboot the unit and commit the change or continue on to configure a Default / Boot Profile (Step 2) or your Alert Profile(s) (Step 3).

Step 2: Configure a Default / Boot Profile.

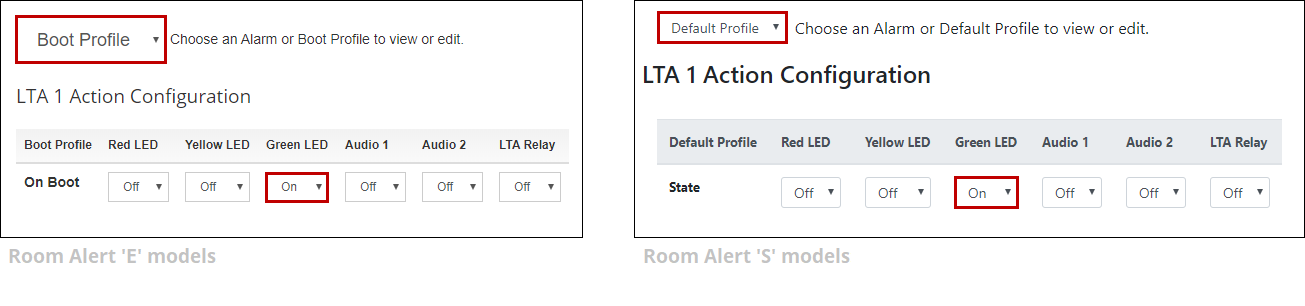
A common Default / Boot Profile for a Light Tower, for example, is to turn the green LED on and all other features off, indicating a clear state. (If your unit reboots and is immediately in an alarm state, the alarm profile will then kick in.)

Follow these instructions to set a Default / Boot Profile:

  1. Select Settings in the navigation bar to the left in your Room Alert’s web interface.
  2. Then select Alarms.
  3. Locate your Light Tower or Relay.
  4. Locate the Profile drop-down menu.
    • On ‘E’ models, you’ll see: “Choose an Alarm or Boot Profile to view or edit.”
    • On ‘S’ models, you’ll see: “Choose an Alarm or Default Profile to view or edit.
  5. Select Boot Profile or Default Profile (depending on your Room Alert model).
  6. Under each feature of the Light Tower or Relay, select what you’d like to happen any time the attached Room Alert reboots. In the example below, we set only the green LED of a Light Tower to turn on.

  7. You may go on to configure Alarm Profiles (Step 3) or select Save now at the top or bottom of the page. Your Room Alert will reboot to commit the changes. In our example, when the unit comes back up, the Light Tower’s green LED will be on.
Step 3: Configure your Alarm Profile(s).

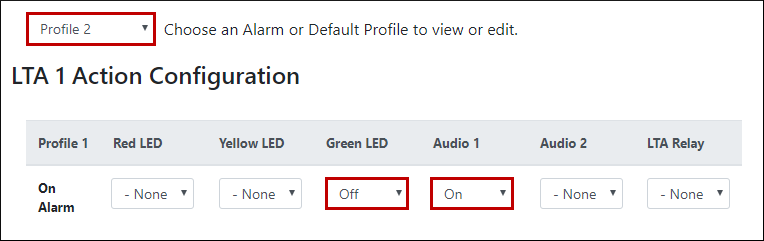
Setting different Alarm Profiles is useful when you want your Light Tower or Relay to behave differently depending on which sensor is in alert status.

Alarm Profiles per Room Alert Model

The number of Alarm Profiles available varies according to model:

Model . . . . . . . . . . . . . . . . . . Alarm Profiles

Room Alert 32S / 32E . . . . . 5

Room Alert 12S / 12E . . . . . 3

Room Alert 4E . . . . . . . . . . . 1

Room Alert 3E / 3S. . . . . . . . 1

To set an Alarm Profile:

  1. Select Settings in navigation bar to the left in your Room Alert’s web interface.
  2. Then select Alarms.
  3. Locate your Light Tower or Relay.
  4. In Choose an Alarm or Default / Boot Profile to view or edit, select Profile X (1, 2, 3, etc.) from the drop-down menu.
  5. Under each feature of the Light Tower or Relay, select what you’d like to happen when that profile executes.

E’ model Example:

  • Profile 1
    • On Alarm: red LED on, green LED off
    • On Clear: green LED on, red LED off
  • Profile 2
    • On Alarm: Audio 1 on
    • On Clear: Audio 1 off

‘S’ model Example:

  • Profile 1
    • On Alarm: red LED on, green LED off
  • Profile 2
    • On Alarm: Audio 1 on, green LED off
  1. Repeat the steps above for each Alarm Profile you wish to create.
  2. When you’re finished configuring your profiles, you may go on to associate them with sensors (Step 4) or select Save now at the top or bottom of the page. Your Room Alert will reboot to commit your changes.

Room Alert S Models – Alarm Profile Conflicts

When multiple alarm profiles are triggered simultaneously, the profiles are simply applied on top of each other. When the behavior of one alarm profile conflicts with another, they are prioritized in this order: ON > OFF > NONE.

Step 4: Associate your Alarm Profiles with sensors.

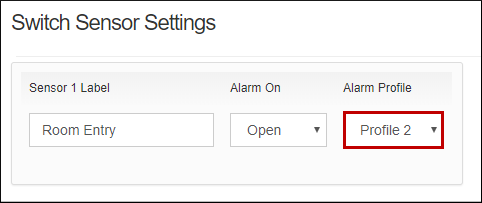
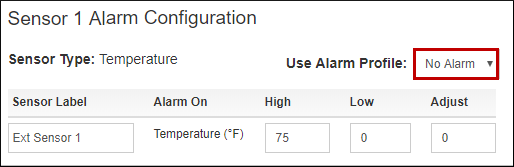
Now that you’ve created your Alarm Profile(s), you’ll need to associate them with sensors so that they execute when that sensor goes into an alarm state.

To associate a profile with a sensor, follow the steps below:

  1. Select the Settings tab from the navigation bar to the left in your Room Alert’s web interface.
  2. Then select Sensors in the Settings menu.
  3. Locate the sensor you wish to set a profile on. In our example, we’ve chosen the internal Temperature & Humidity sensor.
  4. Set at least one threshold on the sensor. In our example, we’ve set a high of 81° Fahrenheit.
  5. In Use Alarm Profile, select the profile you wish to use. In our example, we’re using the default, Profile 1, which we’ve configured to turn on the Light Tower’s red LED. When the temperature exceeds 81° Fahrenheit, the red LED will go on.
  6. Repeat the steps above for each sensor you’d like to trigger your Light Tower or Relay. In our example, we’ve selected Profile 2 for the Room Alert 32E’s Room Entry sensor. Profile 2 will turn the Light Tower’s audio on when the door opens.
  7. If there are active sensors that you do not wish to trigger the Light Tower or Relay with, be sure to select No Alarm Profile next to them in the Use Alarm Profile drop-down menu. (All sensors are set to Profile 1 by default.)
  8. Select Save at the top or bottom of the page. Your Room Alert will reboot to commit the changes.

Working with a Room Alert 12E purchased in 2021? Please see our FAQ, Why Your Room Alert 12E Built-in Relay Behavior May Be Reversed.

Facebooktwitterredditpinterestlinkedinmail
Room Alert is Made in the USA, ships worldwide from our locations in the US and EU, and has been protecting facilities since 1988.

You may find Windows Command Prompt at the following path:

  • Windows 7 & 8
    Start--> All Programs--> Accessories--> Command Prompt
  • Windows 10
    Start--> All Apps--> Windows System--> Command Prompt

To run Windows Command Prompt as an administrator:

  • Windows 7 & 8
    Right-click on Command Prompt and select Run as administrator.
  • Windows 10
    Right-click on Command Prompt, select More and then select Run as administrator.

Example Polling Method Properties saved in Orion SolarWinds:

If you are using this client, you should configure the general SNMPv3 Credentials, but leave the Read / Write SNMPv3 Credentials section blank.

Room Alert Link- Supported Firmware Updates


Current S modelsCurrent E models
Room Alert 32SRoom Alert 32E
Room Alert 12SRoom Alert 12E
Room Alert 4E
Room Alert 3E

Room Alert Manager - Compatible Devices

The latest version of Room Alert Manager supports only the devices below.

It does not support any legacy Room Alert or TemPageR models.

Current S modelsCurrent E models
Room Alert 32SRoom Alert 32E
Room Alert 12SRoom Alert 12E
Room Alert 3SRoom Alert 4E
Room Alert 3E
Room Alert 3W