Knowledge Base / Frequently Asked Questions / Device ManageR (Legacy)
You may bring your existing settings and/or database for Device ManageR to a new installation by copying their containing program folders and pasting them into the new installation.
– The existing and new Device ManageR should be at the same software version number; copying these files from an older to a newer version of Device ManageR could cause issues. This FAQ shows you how to update your existing Device ManageR to the latest version: How To Install Device ManageR.
– It’s best to copy your configuration and/or database to a fresh installation before you’ve done any configuration or built up any history in the new Device ManageR system.
The instructions below require you to stop and start the Device ManageR service. You may see our FAQ How To Stop, Start And Restart The Device ManageR Service for help.
The ‘conf’ folder contains your Device ManageR settings; the ‘deviceDB’ folder contains the database. You may bring either one or both to the new system.
1. In the original system where Device ManageR is installed, stop the Device ManageR service.
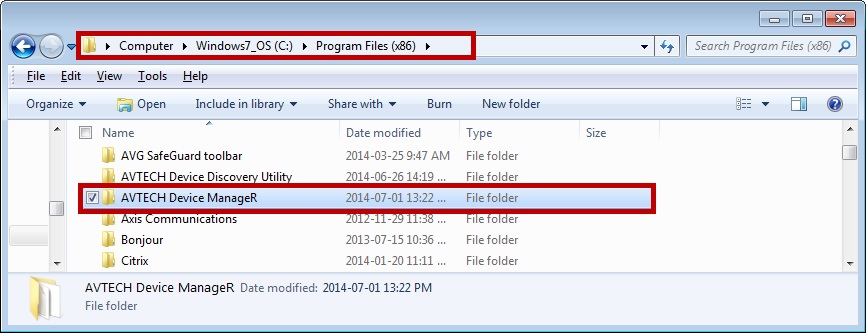
2. Navigate to your Device ManageR installation directory. The default path is C:\Program Files\AVTECH Device ManageR.

3. Locate and copy the ‘conf’ and/or ‘deviceDB’ folders.
4. Start the Device ManageR service again if you wish.
1. On the new system where Device Manager is installed, stop the Device ManageR service.
2. Navigate to your Device ManageR installation directory. Again, the default path is C:\Program Files\AVTECH Device ManageR.
3. conf
– Delete the new system’s existing ‘conf’ folder. (Note that deleting this folder will remove any settings you’ve already entered into your new Device ManageR installation.)
– Paste in the ‘conf’ folder from the original system.
4. deviceDB
– Delete the new system’s existing ‘deviceDB’ folder. (Note that deleting this folder will remove any built-up history in your new Device ManageR installation.)
– Paste in the ‘deviceDB’ folder from the original system.
5. Start the Device ManageR service again.
6. Open Device ManageR in your browser at localhost:8080 or <IP address of Device ManageR system>:8080.
– If you copied your ‘conf’ folder, the alerts, contacts, widgets, etc. from your original installation will now appear here.
– If you brought in the ‘deviceDB’ folder, the historical alerts and sensor data from your original installation will now appear as well.

You may find Windows Command Prompt at the following path:
To run Windows Command Prompt as an administrator:
| Current S models | Current E models |
|---|---|
| Room Alert 32S | Room Alert 32E |
| Room Alert 12S | Room Alert 12E |
| Room Alert 3S | Room Alert 4E |
| Room Alert 3E | |
| S models | E & W models |
|---|---|
| Room Alert 32S | Room Alert 32E |
| Room Alert 12S | Room Alert 12E |
| Room Alert 3S | Room Alert 4E |
| Room Alert 3E | |
| Room Alert 3W |
| Model |
|---|
| Room Alert MAX |
| Room Alert 32S |
| Room Alert 12S |
| Room Alert 3S |
| Room Alert 32E/W |
| Room Alert 12E |
| Room Alert 4E |
| Room Alert 3E |
| Room Alert 3 Wi-Fi |