
Knowledge Base / Frequently Asked Questions / Room Alert Monitors (PRO, MAX, and Legacy) / Legacy
Using the new version of the Room Alert Monitor web interface? Please click here for the appropriate FAQ.
In order to send alerts based on the thresholds you configure in the Room Alert web interface, you must set up SMTP email.
1. Open the Room Alert Monitor web interface. You may open the interface using Device Discovery or Device ManageR, or by typing the IP address of the unit directly into the address bar of your web browser.
2. Select the Settings tab at the top of the screen.
3. Select SMTP Email in the navigation bar to the left. Below is the Email Settings page shown at defaults.
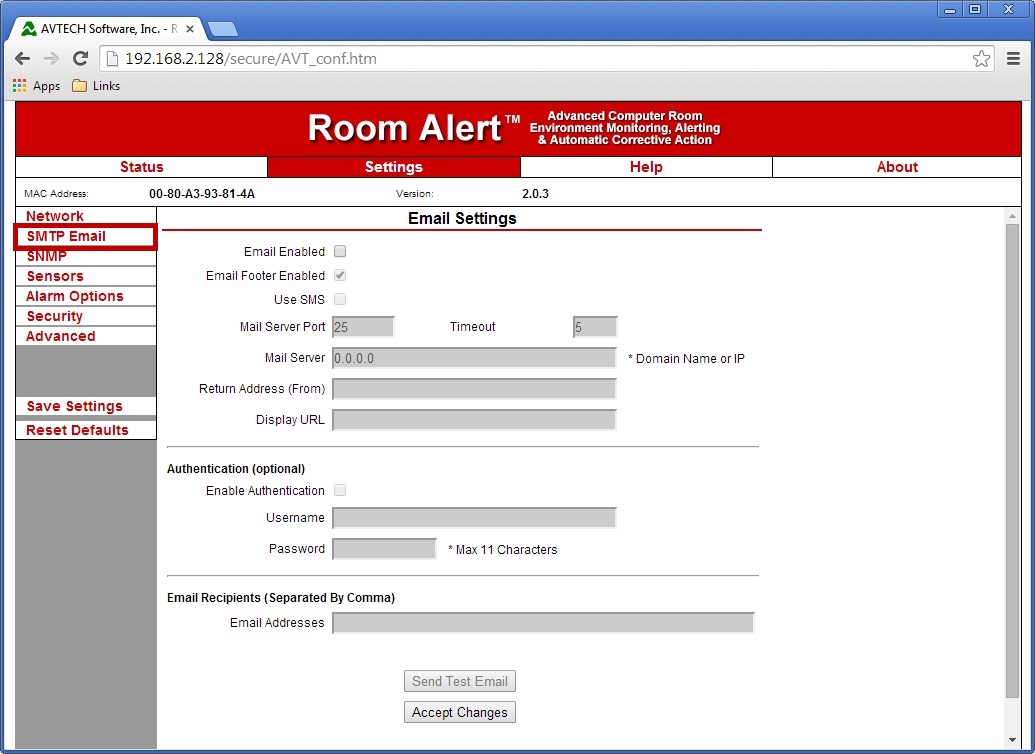
Do not enclose email or email-to-SMS addresses in angle brackets (<>).
1. Select the Email Enabled check box.
2. You may leave the Mail Server Port at the default, 25, or change it to the port your mail server uses.
3. In Mail Server, enter the domain name or IP address of your mail server.
The Room Alert Monitor does not support SSL or TLS mail servers. If your mail server requires SSL or TLS, you may use AVTECH’s Device ManageR software instead to set up your email alerts, or you may use your account at RoomAlert.com for email alerts, which does not require any mail server set up at all.
4. In Return Address, enter the email address you want the alerts to come from.
– This email address must already exist on your mail server.
5. In Display URL, you may leave the default (blank) or enter an IP address.
– If you leave the field blank, once you save your email settings, the unit will reboot with its IP address automatically filled in.
– This IP address displays at the bottom of alert emails so that you may click on it and quickly access the web interface of the Room Alert.

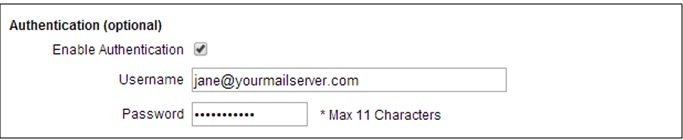
If the return address email account requires a username and password, enter it here. Otherwise, you may leave all of these fields blank.
1. Select the Enable Authentication check box.
2. In Username, enter the user name for the return address email address.
3. In Password, enter the password for the return address email address.
In Email Recipients, enter 1 or more email addresses to receive alerts.
– Separate email addresses with commas. You do not need to leave a space after the comma.
– They may be email or email-to-SMS addresses.
– This field accepts up to 79 characters; if that is not long enough to accommodate all of the contacts you’d like to send alerts to, you may wish to create a distribution list on your mail server so that one email address forwards to many people.

1. Once you’ve entered your settings, select Accept Changes at the bottom of the page to temporarily save your settings.
2. Then select Save Settings in the navigation bar to the left. Your Room Alert Monitor will reboot with your new SNMP email settings.
After your unit has rebooted, select the Test Email button to send a test email to all of the recipients in the ‘Email Recipients’ field.
If the test message is not received, first check any spam filters on the recipient’s account. Then make sure the mail server is configured to allow SMTP relaying from the IP address of the monitor.
We'd love to talk with you about your monitoring needs. Contact one of our Product Specialists for a free consultation.


You may find Windows Command Prompt at the following path:
To run Windows Command Prompt as an administrator:

If you are using this client, you should configure the general SNMPv3 Credentials, but leave the Read / Write SNMPv3 Credentials section blank.
| Current S models | Current E models |
|---|---|
| Room Alert 32S | Room Alert 32E |
| Room Alert 12S | Room Alert 12E |
| Room Alert 3S | Room Alert 4E |
| Room Alert 3E | |
| S models | E & W models |
|---|---|
| Room Alert 32S | Room Alert 32E |
| Room Alert 12S | Room Alert 12E |
| Room Alert 3S | Room Alert 4E |
| Room Alert 3E | |
| Room Alert 3W |
| Model |
|---|
| Room Alert MAX |
| Room Alert 32S |
| Room Alert 12S |
| Room Alert 3S |
| Room Alert 32E/W |
| Room Alert 12E |
| Room Alert 4E |
| Room Alert 3E |
| Room Alert 3 Wi-Fi |
