Your Device ManageR software must be at the minimum version of 6.3.5 to be compatible with the Digital Active Power Sensor. You may download the latest version of Device ManageR from your account at RoomAlert.com.
Once you have configured your mail server, your contacts, your actions and your Action/Notification Lists in Device ManageR , you may set up an alert for your Digital Active Power Sensor by following the instructions below:
1. Open Device ManageR in your web browser. You may open it by entering ‘localhost:8080’ or ‘<IP address of Device ManageR’s host system>:8080’ in your browser’s address bar.
2. Select Alerts / Tasks in the navigation bar to the left.
3. In the Alerts / Tasks menu, select Alerts.
4. Select Add to add a new alert.
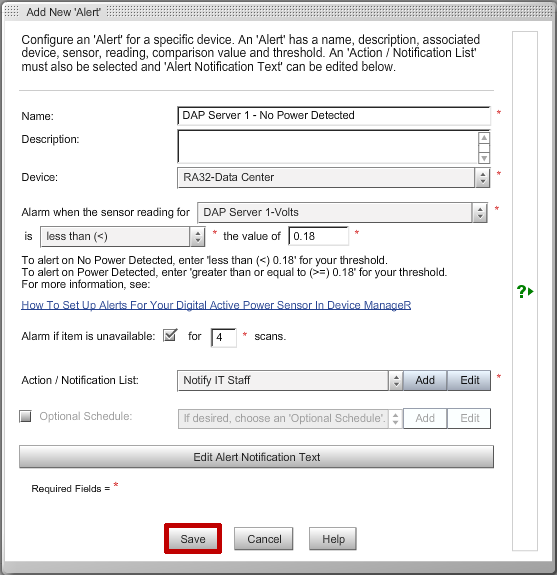
5. In the Add New Alert screen that appears:
– In Name, enter a name for your alert. Our example is called DAP Server 1 – No Power Detected.
– In Device, select your Room Alert Monitor from the drop-down list. We’re choosing the Room Alert 32E in our data center.
– In Alarm when…, you’ll then see a drop-down list with all of the unit’s individual sensors. Select your Digital Active Power Sensor – Volts. (Ext Sensor 1 – Volts, for example.)
– In is, set the threshold for the Digital Active Power Sensor:
To alert for power OFF, enter ‘less than (<) 0.18.’

The Digital Active Power Sensor considers power to be off when it detects less than 0.18 volts.
With this setting, when the voltage reaches 0.17 or lower, Device ManageR will go into an alert state; this alert state will clear when the voltage reaches 0.18 or higher.
To alert for power ON, enter ‘greater than or equal to (>=) 0.18.’

The Digital Active Power Sensor considers power to be on when it detects 0.18 or more volts.
With this setting, when the voltage reaches 0.18 or higher, Device ManageR will go into an alert state; this alert state will clear when the voltage reaches 0.17 or lower.
– In Alarm if item is unavailable for X scans, you may leave the default, 4 scans, or enter another value. You may also disable this feature if you wish by unchecking the check box. In our example, we’re leaving the default.
– In Action / Notification List, select an already-configured list from the drop-down menu or create a new one by selecting Add. Here we’re choosing a List we called Notify IT Staff.
– Then select Save.


