
Knowledge Base / Frequently Asked Questions / Room Alert Account (RoomAlert.com)
Starting with the following firmware releases, the AVTECH devices listed below automatically push sensor data to RoomAlert.com.
Push to RoomAlert.com is enabled by default.
The instructions below show you how to configure push.
You may enable or disable push to RoomAlert.com in the Settings → Advanced page of the Room Alert 32S, 12S or 3S web interface, or the Settings → Push page of the MAX Base Station.

For Room Alert models 32E, 12E, 4E and 3E, you may configure push to RoomAlert.com using Telnet. Please note that Telnet is disabled by default in Windows versions Vista and above. For instructions on enabling it, please see this FAQ: How To Enable Telnet In Windows (Versions Vista And Above).
1. Open Windows Command Prompt, which you may find at the following path on your Windows system: Start–> All Programs–> Accessories–> Command Prompt.
2. At the prompt, enter the following command, as shown in the example below.
telnet <Room Alert Monitor IP address> 9999

3. If you are prompted for your Room Alert Monitor password, enter it and then press the Enter key on your keyboard. Otherwise, simply press Enter.

You must press Enter within a few seconds or you’ll get a ‘Connection to host lost’ message. If you see that message, press Enter to get the prompt back and re-enter the telnet command from Step 2.
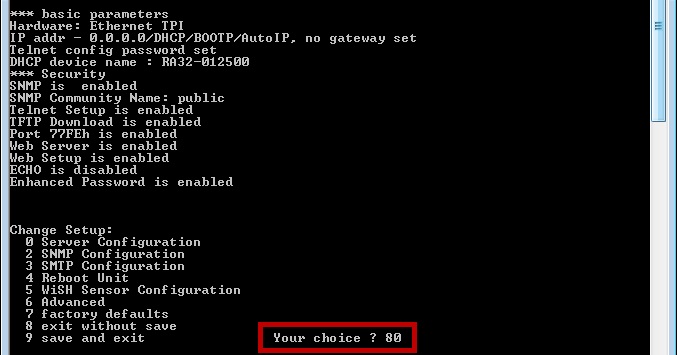
4. The Telnet menu will appear as shown below.
5. At the ‘Your choice?’ prompt, enter ’80.’
6. The ‘Enable RoomAlert.com push?’ prompt appears. From here, you can either disable push or re-enable and configure push:
Disable
– To disable, enter ‘N.’
OR
Re-enable / Configure
– First, to re-enable, enter ‘Y.’
– Then, enter the time interval between pushes that you’d prefer. You may choose one of the following:
– For a 60 minute interval, enter ‘1.’ (60 minutes is the default.)
– For a 12-hour interval, enter ‘2.’
– For a 24-hour interval, enter ‘3.’
– Finally, enter the length of time you prefer it to take for a push attempt to timeout. You may enter a timeout value between 5 and 255 seconds. (10 seconds is the default.)
7. Then, the Telnet menu will reappear. This time, at the ‘Your choice?’ prompt, enter ‘9,’ which corresponds to ‘save and exit.’

8. Once you see the ‘Parameters stored’ and ‘Connection to host lost’ messages, you may close Windows Command Prompt.
9. Your Room Alert Monitor will reboot with your new settings for push to RoomAlert.com.
We'd love to talk with you about your monitoring needs. Contact one of our Product Specialists for a free consultation.


You may find Windows Command Prompt at the following path:
To run Windows Command Prompt as an administrator:

If you are using this client, you should configure the general SNMPv3 Credentials, but leave the Read / Write SNMPv3 Credentials section blank.
| Current S models | Current E models |
|---|---|
| Room Alert 32S | Room Alert 32E |
| Room Alert 12S | Room Alert 12E |
| Room Alert 3S | Room Alert 4E |
| Room Alert 3E | |
| S models | E & W models |
|---|---|
| Room Alert 32S | Room Alert 32E |
| Room Alert 12S | Room Alert 12E |
| Room Alert 3S | Room Alert 4E |
| Room Alert 3E | |
| Room Alert 3W |
| Model |
|---|
| Room Alert MAX |
| Room Alert 32S |
| Room Alert 12S |
| Room Alert 3S |
| Room Alert 32E/W |
| Room Alert 12E |
| Room Alert 4E |
| Room Alert 3E |
| Room Alert 3 Wi-Fi |
