Support

Knowledge Base  /  Frequently Asked Questions  /  Room Alert Manager

How To Configure Room Alert Manager To Write To An External Database

By default, Room Alert Manager uses a built-in H2 database to store its configuration settings and historic sensor data; however, if you plan to retain a significant amount of sensor data, it is best to store it to an external database. Room Alert Manager currently support both SQL Server and MySQL. Please note that when you switch to a new database, any sensor data stored in the original database does not get migrated over.

Select the tabs below for instructions to configure Room Alert Manager to work with SQL Server or MySQL.

SQL ServerMySQL

The current version of Room Alert Manager supports SQL Server 2017 and newer.

Step 1: Configure your database in SQL Server.

  • Configure a new database to store your Room Alert sensor data.
    • You may use any naming convention you’d like. In our example, we called our database “roomalertmanager.”
  • Create a schema for your new database. It must be named “room_alert_manager.”
  • Create a new login. In our example, we called ours “ITMgr.”
    • For best results, we recommend configuring this user with SQL Server Authentication (as opposed to Windows Authentication.)
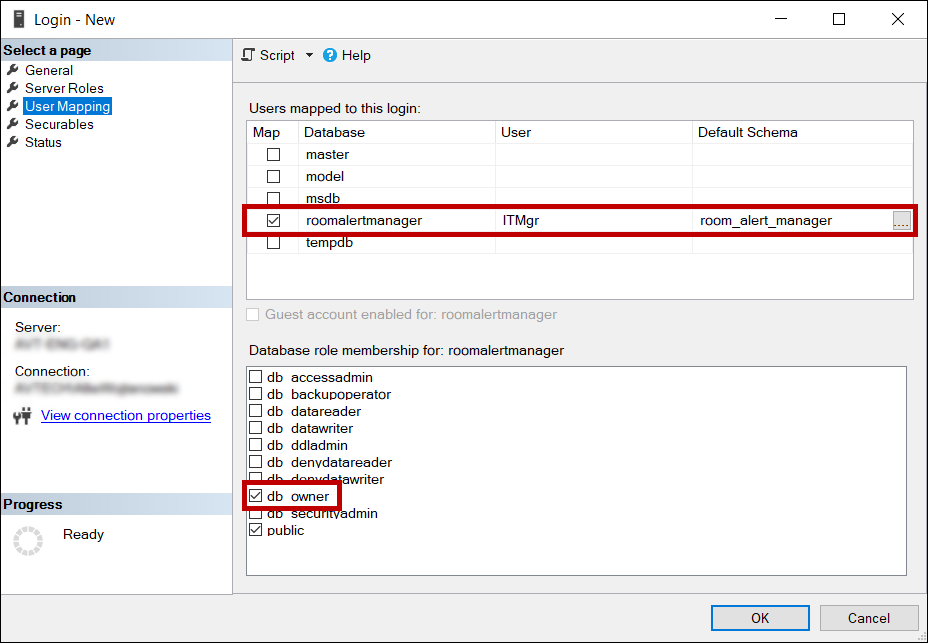
    • This user should be mapped ONLY to the new database that you created.
    • Assign this user the role of “db owner.”

The screenshot below shows our example Login’s User Mapping Properties.

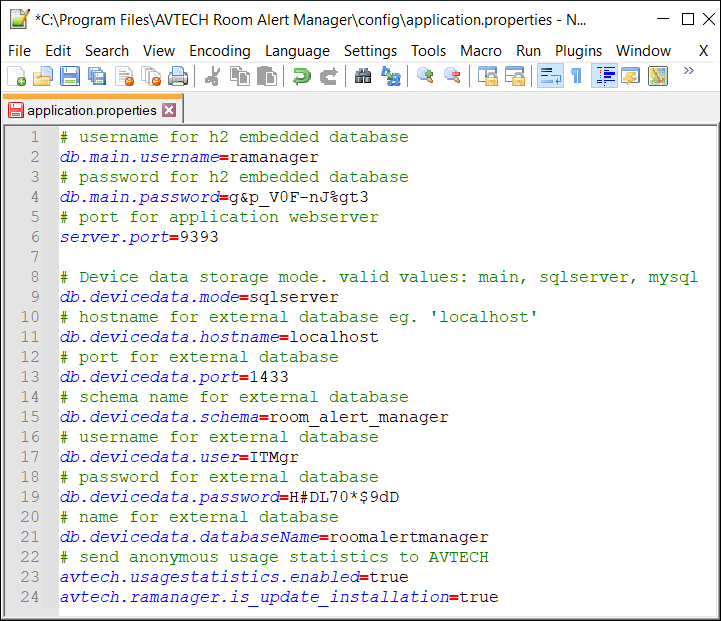
Step 2: Configure your settings in Room Alert Manager.

Follow the steps below to configure Room Alert Manager to log sensor data to your SQL Server database.

These instructions require you to start and stop the Room Alert Manager service. This FAQ shows you how: How To Stop, Start And Restart The Room Alert Manager Service.

  1. Stop the Room Alert Manager service.
  2. Navigate to Room Alert Manager’s installation folder on its host system.
    • By default, it’s at C:\Program Files\AVTECH Room Alert Manager.
  3. Locate the “config” folder and open it.
  4. In the “config” folder, locate the “application.properties” file.
  5. Open that file in any text editor, such as Notepad or Notepad++.
  6. Then edit the following lines:
    • db.devicedata.mode
      • Set this value = sqlserver
      • When this value is set to main, Room Alert Manager logs sensor data to its embedded H2 database.
    • db.devicedata.hostname
      • If Room Alert Manager and your SQL Server are installed on the same computer, set this value = localhost
      • Otherwise, enter your SQL Server’s hostname or IP address.
    • db.devicedata.port
      • Set this value = your SQL Server database port.
      • The default SQL Server port is 1433, which is what we used in our example.
    • db.devicedata.schema
      • Set this value = room_alert_manager
      • Your SQL Server’s schema name must be room_alert_manager.
    • db.devicedata.user
      • Set this value = the username you created for your SQL Server.
      • In our example, our username is ITMgr.
    • db.devicedata.password
      • Set this value = the password you gave to that username.
    • db.devicedata.databaseName
      • Set this value = the name you gave your SQL Server database.
      • In our example, our database name is roomalertmanager.
  7. When you’re done making changes, save the “application.properties” file.
  8. You may now close Room Alert Manager’s installation folder.
  9. Then start the Room Alert Manager service.
  10. Room Alert Manager will connect to your SQL Server database and begin logging sensor data to it.

The current version of Room Alert Manager supports MySQL v5.7 and newer.

Follow the steps below to configure Room Alert Manager to log sensor data to your MySQL database.

These instructions require you to start and stop the Room Alert Manager service. This FAQ shows you how: How To Stop, Start And Restart The Room Alert Manager Service.

  1. Stop the Room Alert Manager service.
  2. Navigate to Room Alert Manager’s installation folder on its host system.
    • By default, it’s at C:\Program Files\AVTECH Room Alert Manager.
  3. Locate the “config” folder and open it.
  4. In the “config” folder, locate the “application.properties” file.
  5. Open that file in any text editor, such as Notepad or Notepad++.
  6. Then edit the following lines:
    • db.devicedata.mode
      • Set this value = mysql
      • When this value is set to main, Room Alert Manager logs sensor data to its embedded H2 database.
    • db.devicedata.hostname
      • If Room Alert Manager and MySQL are installed on the same computer, set this value = localhost
      • Otherwise, enter the hostname or IP address for MySQL.
    • db.devicedata.port
      • Set this value = your MySQL database port.
      • The default MySQL port is 3306, which is what we used in our example.
    • db.devicedata.schema
      • Set this value = the name of your MySQL schema.
        (“Schema” is MySQL’s term for “database.”)
    • db.devicedata.user
      • Set this value = the username you created for MySQL.
      • In our example, our username is ITMgr.
    • db.devicedata.password
      • Set this value = the password you gave to that username.
    • db.devicedata.databaseName
      • This must be the same as your db.devicedata.schema
  7. When you’re done making changes, save the “application.properties” file.
  8. You may now close Room Alert Manager’s installation folder.
  9. Then start the Room Alert Manager service.
  10. Room Alert Manager will connect to your MySQL database and begin logging sensor data to it.

To go back to using Room Alert Manager’s embedded H2 database, simply set db.devicedata.mode=main again.

Facebooktwitterredditpinterestlinkedinmail
Room Alert is Made in the USA, ships worldwide from our locations in the US and EU, and has been protecting facilities since 1988.

You may find Windows Command Prompt at the following path:

  • Windows 7 & 8
    Start--> All Programs--> Accessories--> Command Prompt
  • Windows 10
    Start--> All Apps--> Windows System--> Command Prompt

To run Windows Command Prompt as an administrator:

  • Windows 7 & 8
    Right-click on Command Prompt and select Run as administrator.
  • Windows 10
    Right-click on Command Prompt, select More and then select Run as administrator.

Example Polling Method Properties saved in Orion SolarWinds:

If you are using this client, you should configure the general SNMPv3 Credentials, but leave the Read / Write SNMPv3 Credentials section blank.

Room Alert Link- Supported Firmware Updates


Current S modelsCurrent E models
Room Alert 32SRoom Alert 32E
Room Alert 12SRoom Alert 12E
Room Alert 4E
Room Alert 3E

Room Alert Manager - Compatible Devices

The latest version of Room Alert Manager supports only the devices below.

It does not support any legacy Room Alert or TemPageR models.

Current S modelsCurrent E models
Room Alert 32SRoom Alert 32E
Room Alert 12SRoom Alert 12E
Room Alert 3SRoom Alert 4E
Room Alert 3E
Room Alert 3W