Support

Knowledge Base  /  Frequently Asked Questions  /  Axis Cameras

How To Configure Your Axis Camera To Send Images To Room Alert Manager When Motion Is Detected

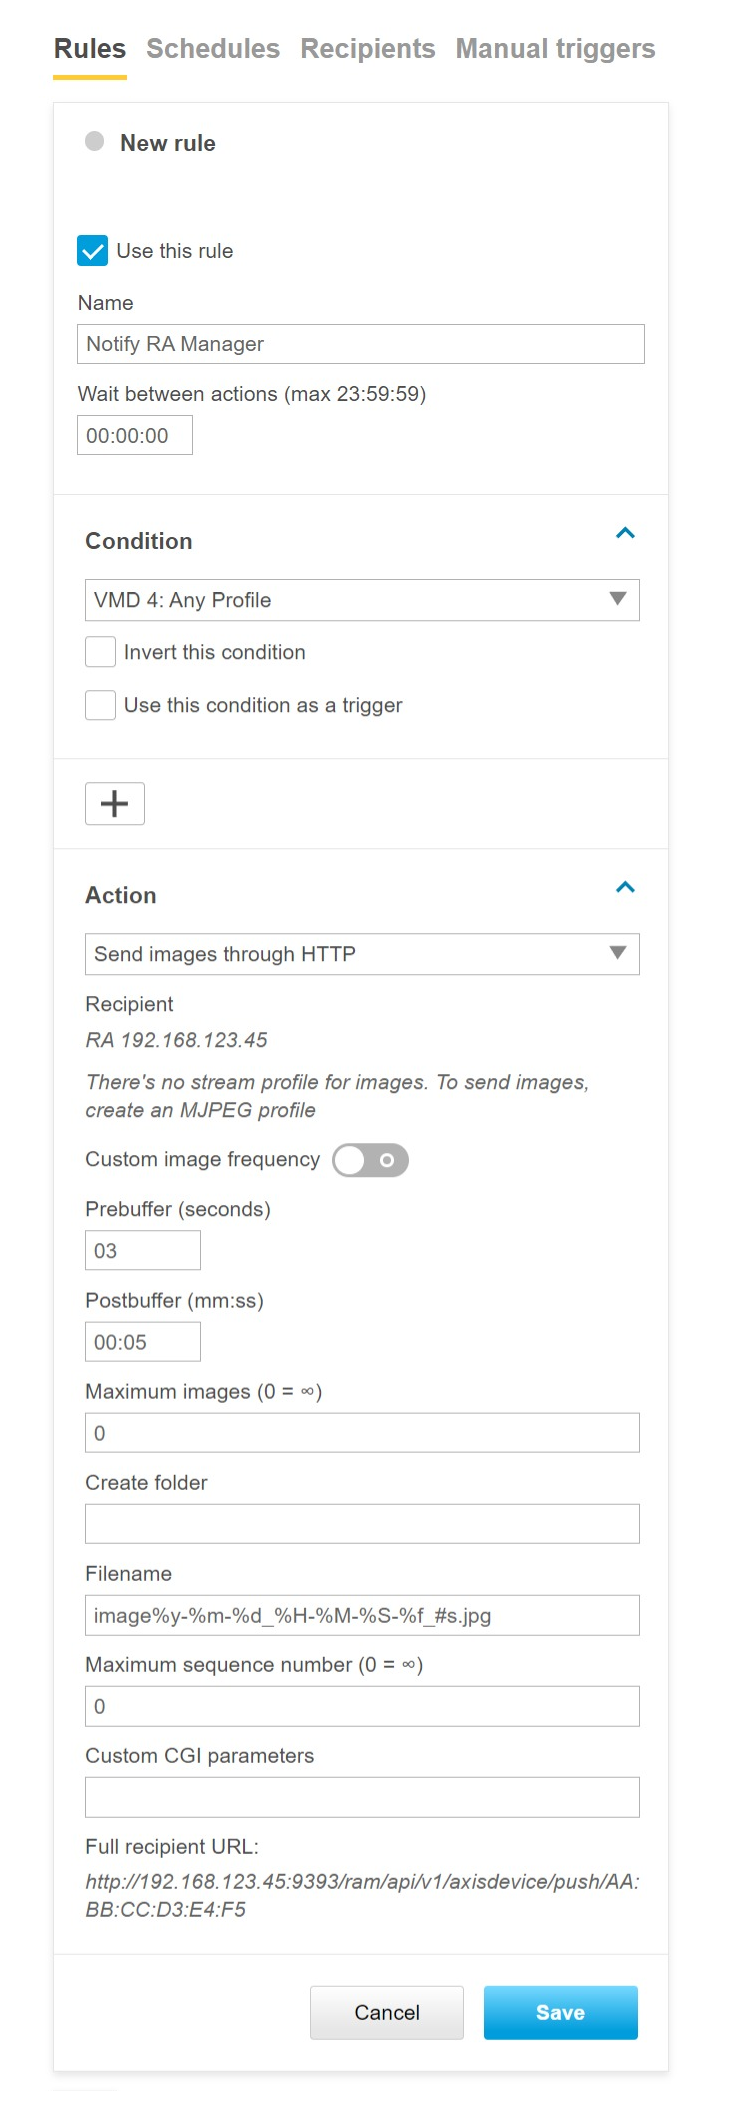
In order for Room Alert Manager to alert you when your Axis camera detects motion, you must first configure your camera to notify Room Alert Manager.

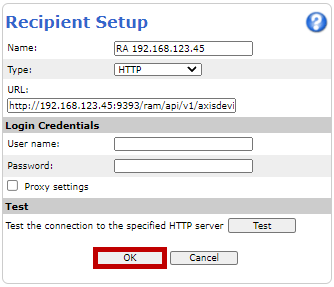
Once you’ve configured your camera with a motion event, your camera will send notifications to Room Alert Manager over HTTP port 9393 when it detects motion.

Before you start

Check your camera's firmware version.

Room Alert Manager supports Axis network cameras running firmware version 6 or higher.

Follow the instructions in this FAQ to find your camera’s firmware version: Where To Find The Firmware Version Of Your Axis Camera.

Configuring a Motion Event on an Axis Camera

Step 1: Configure a Recipient / Event Server.
Current Web InterfaceOld Web Interface
  1. Open your camera’s web interface, and then click Settings in the bottom right corner of the screen.
  2. In the Settings tray that opens, navigate to the System tab, and then click Events.
  3. In the window that opens, select Recipients.
  4. Select + to add your first recipient. Here you’re going to enter your instance of Room Alert Manager to receive HTTP notifications:
    • In Name, enter a name for your recipient. In our example, we’re entering “RA 192.168.123.45.”
    • In Type, select HTTP from the drop-down menu.
    • In URL, enter the following (do not include the square brackets in your URL) :
      http://[Room Alert Manager's Host IP Address]:[Room Alert Manager's web port]/ram/api/v1/axisdevice/push/[Camera_MAC]
      • In our example, Room Alert Manager’s host system is 192.168.123.45, and the service is using the default web port, 9393: http://192.168.123.45:9393/ram/api/v1/axisdevice/push/AA:BB:CC:D3:E4:F5
  5. You may leave the login credentials blank.
  6. Select Test to test the connection.
    • You should see a Connection successful message. Select OK to dismiss it.
    • If your connection test fails, you may need to open inbound TCP port 9393 in the firewall on Room Alert Manager’s host system.
    • Finally, select Save to save your new recipient.
    1. With your camera’s web interface open to the Setup page, select Events in the navigation bar to the left.
    2. In the window that opens, select Recipients.
    3. Select Add. Here you’re going to enter your instance of Room Alert Manager to receive HTTP notifications:
      • In Name, enter a name for your recipient. In our example, we’re entering “RA 192.168.123.45.”
      • In Type, select HTTP from the drop-down menu.
      • In URL, enter the following (do not include the square brackets in your URL) :
        http://[Room Alert Manager's Host IP Address]:[Room Alert Manager's web port]/ram/api/v1/axisdevice/push/[Camera_MAC]
        • In our example, Room Alert Manager’s host system is 192.168.123.45, and the service is using the default web port, 9393: http://192.168.123.45:9393/ram/api/v1/axisdevice/push/AA:BB:CC:D3:E4:F5
    4. You may leave the login credentials blank.
    5. Select Test to test the connection.
      • You should see a Connection successful message. Select OK to dismiss it.
      • If your connection test fails, you may need to open inbound TCP port 9393 in the firewall on Room Alert Manager’s host system.
      • Finally, select OK to save your new recipient.
    Step 2: Configure Video Motion Detection settings / a Motion Detection window.

    You may configure Axis Video Motion Detection application settings or simply leave them at defaults. To view or configure them:

    1. With your camera’s web interface, navigate to Apps (or Applications).
    2. The find Axis Video Motion Detection. Click it to access available settings.
    3. For information about the settings that are available, please see the Video Motion Detection manual on Axis’ website here: Axis Video Motion Detection (Axis website).
    4. If you make any changes, be sure to select Save.
    5. Select Close to dismiss the window.
    Step 3: Configure Your Action Rule / Event Type.
    Current Web InterfaceOld Web Interface
    1. Open your camera’s web interface, and then click Settings in the bottom right corner of the screen.
    2. In the Settings tray that opens, navigate to the System tab, and then click Events.
    3. In the window that opens, select Rules.
    4. Select + to add your first rule.
    5. Make sure Use this rule is selected (enabled).
    6. In Name, enter a name for the rule. We’re calling ours ‘Notify RA Manager.’
    7. In Wait between actions, you may leave the default, 00:00:00.
    8. In Condition, select VMD 4: Any Profile (or VMD: Profile X if there’s a specific profile you’d like to use).
    9. You may leave the checkboxes Invert this condition and Use this condition as a trigger at the default, unchecked.
    10. In the Action drop-down menu, select Send images through HTTP (or HTTPS if required).
    11. If you only have one recipient, it will be selected automatically.
      • Otherwise, in the drop-down menu, choose the recipient you made earlier.
    12. You may leave the default selections for Image Frequency, Prebuffer, Postbuffer, Maximum Images, Maximum Sequence Number, and CGI Parameters, or adjust these settings as desired.
    13. You may leave Create folder empty, and keep the default selections in Filename.
    14. Then select Save to save your new rule.
    1. With your camera’s web interface open to the Setup page, navigate to EventsAction Rules  in the navigation bar to the left.
    2. In the window that appears, select Add.
    3. In the General section, make sure Enable rule is selected.
    4. In Name, enter a name for the rule. We’re calling ours ‘Notify RA Manager.’
    5. In Trigger, select Applications.
    6. Leave Start condition only at the default, unchecked.
    7. In the drop down-menu that appears, select VMD 4 or VideoMotionDetection depending on which Video Motion Detection version you have installed.
    8. In Active (or Motion Detected), leave the default, Yes, selected.
    9. In Schedule, select Always (No Schedule).
    10. Leave Additional conditions blank, which is the default.
    11. In Wait at least, you may leave the default, 00:00:00.
    12. In Type, select Send Images.
    13. In Stream profile, select JPEG.
    14. You may leave the default selections in Image frequency, Duration, and Limit, or adjust these settings as desired.
    15. In the Recipient drop-down menu, select the recipient you made earlier.
    16. You may leave Create folder empty, and keep the default selections in Base file name.
    17. Then select OK to save your new rule.

    Up Next

    Configure a motion alert in Room Alert Manager.

    Once you’ve configured your Axis camera with a motion event, you may set up a motion alert in Room Alert Manager. Please see this FAQ for instructions: How To Configure An Axis Camera Motion Detection Alert In Room Alert Manager.

    Facebooktwitterredditpinterestlinkedinmail
    Room Alert is Made in the USA, ships worldwide from our locations in the US and EU, and has been protecting facilities since 1988.

    You may find Windows Command Prompt at the following path:

    • Windows 7 & 8
      Start--> All Programs--> Accessories--> Command Prompt
    • Windows 10
      Start--> All Apps--> Windows System--> Command Prompt

    To run Windows Command Prompt as an administrator:

    • Windows 7 & 8
      Right-click on Command Prompt and select Run as administrator.
    • Windows 10
      Right-click on Command Prompt, select More and then select Run as administrator.

    Example Polling Method Properties saved in Orion SolarWinds:

    If you are using this client, you should configure the general SNMPv3 Credentials, but leave the Read / Write SNMPv3 Credentials section blank.

    Room Alert Link- Supported Firmware Updates


    Current S modelsCurrent E models
    Room Alert 32SRoom Alert 32E
    Room Alert 12SRoom Alert 12E
    Room Alert 4E
    Room Alert 3E

    Room Alert Manager - Compatible Devices

    The latest version of Room Alert Manager supports only the devices below.

    It does not support any legacy Room Alert or TemPageR models.

    Current S modelsCurrent E models
    Room Alert 32SRoom Alert 32E
    Room Alert 12SRoom Alert 12E
    Room Alert 3SRoom Alert 4E
    Room Alert 3E
    Room Alert 3W