
Knowledge Base / Frequently Asked Questions / Device ManageR (Legacy)
Before you begin testing your GSM modem:
– Connect the modem to Device ManageR’s host system.
– Install the most recent version of the modem’s drivers, which will ensure the host system is able to connect properly to the modem. The drivers should be available from the manufacturer.
– Determine the COM port that your modem is connected to. This FAQ shows you how: How To Check The COM Port Of Your Modem.
Now that you have confirmed the COM port, you may attempt to manually send an SMS message using PuTTY or another serial connection tool. In our example, we’re using PuTTY.
1. Open PuTTY.
2. Select Session in the navigation bar to the left.
3. In Connection type, select Serial.
4. In Serial line, enter the COM port your modem is connected to.
5. In Speed, enter the maximum port speed (baud rate) of your modem. In our example, the COM port is COM12, and the speed is 115200.
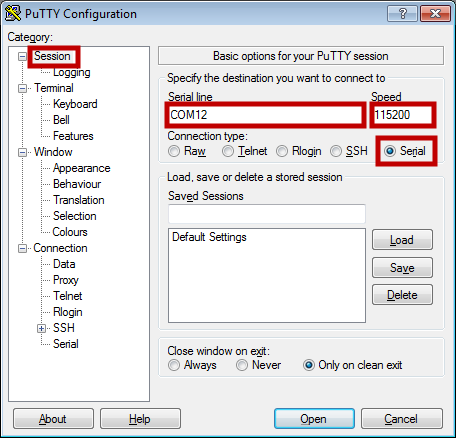
6. Then select Open at the bottom of the screen to open the connection to the modem. The window shown below will appear; you may now type commands to the modem.

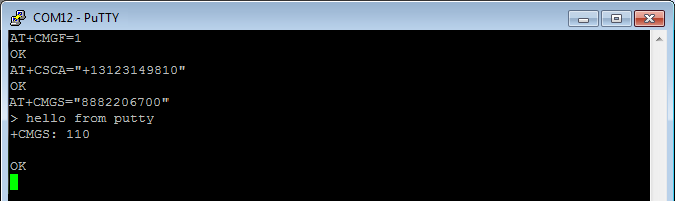
7. Now attempt to send a text message by entering the commands below in order, one line at a time.
In the commands below:
– Replace ~C with pressing the Enter key on your keyboard.
– Replace ^Z with pressing Ctrl+Z on your keyboard.
– Replace [SERVICE] with your GSM service center number.
– Replace [PHONE] with number you want to send a text to. (If you’re outside the U.S., you may need to place a ‘+’ sign before the phone number.)
– Replace [ALARM_TEXT] with a text message. In our example, our text message is “hello from putty.”
Commands:
AT+CMGF=1~C
AT+CSCA=”+[SERVICE]”~C
AT+CMGS=”[PHONE]”~C
[ALARM_TEXT]^Z~C
If these commands are successful, your screen will appear as shown below, and you’ll receive the text message on the target phone number.
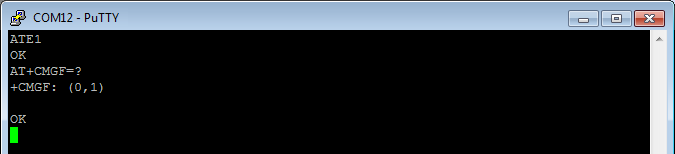
SMS text mode is the only mode currently supported by Device ManageR. To verify that your modem supports it, enter the command below. If SMS text mode is available, you’ll see a 1, as in the response ‘+CMGF: (0,1).’
AT+CMGF=?
Next, ensure you’ve inserted a SIM card into the modem that has been unlocked and is tied to an activated data plan with a phone service provider. Enter this command to verify that the SIM card is unlocked. It should respond with ‘+CPIN: READY.’
AT+CPIN?

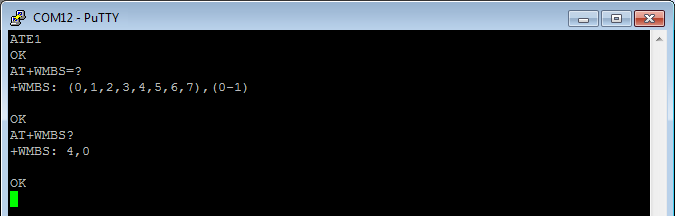
Once the SIM card is verified, ensure the proper band setting is being used to connect to the SMS service center. Enter the command below to verify what the modem is currently set to.
AT+WMBS=?
+WMBS: 4,0
The below commands will cause the modem to respond with the available band settings for this modem.
AT+WMBS?
These are the available band settings for a Sierra Wireless GL6110 modem.
+WMBS: 0,x Mono band mode 850MHz is selected
+WMBS: 1,x Mono band mode extended 900MHz is selected
+WMBS: 2,x Mono band mode 1800MHz is selected
+WMBS: 3,x Mono band mode 1900MHz is selected
+WMBS: 4,x Dual band mode 850/1900MHz are selected
+WMBS: 5,x Dual band mode extended 900MHz/1800MHz are selected
+WMBS: 6,x Dual band mode extended 900MHz/1900MHz are selected
If you do not have a Sierra Wireless GL6110 modem, please review the documentation provided with your modem to verify which setting indicates which band setting.
To change the current band setting, you may use these commands:
To set the modem to the dual band 850/1900MHz (North America & U.S.)
AT+WMBS=4
AT+CFUN=1
To set the modem to the dual band 900/1800MHz (UK and most countries outside of North America)
AT+WMBS=5
AT+CFUN=1
We'd love to talk with you about your monitoring needs. Contact one of our Product Specialists for a free consultation.


You may find Windows Command Prompt at the following path:
To run Windows Command Prompt as an administrator:

If you are using this client, you should configure the general SNMPv3 Credentials, but leave the Read / Write SNMPv3 Credentials section blank.
| Current S models | Current E models |
|---|---|
| Room Alert 32S | Room Alert 32E |
| Room Alert 12S | Room Alert 12E |
| Room Alert 3S | Room Alert 4E |
| Room Alert 3E | |
| S models | E & W models |
|---|---|
| Room Alert 32S | Room Alert 32E |
| Room Alert 12S | Room Alert 12E |
| Room Alert 3S | Room Alert 4E |
| Room Alert 3E | |
| Room Alert 3W |
| Model |
|---|
| Room Alert MAX |
| Room Alert 32S |
| Room Alert 12S |
| Room Alert 3S |
| Room Alert 32E/W |
| Room Alert 12E |
| Room Alert 4E |
| Room Alert 3E |
| Room Alert 3 Wi-Fi |
