Support

Knowledge Base  /  Frequently Asked Questions  /  Device Discovery Utility

How To Recover Room Alert Firmware With The Device Discovery Utility

Your Room Alert Monitor is requesting a firmware recovery if you observe all of these conditions:

– The unit is not accessible on the network.

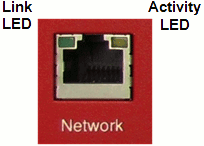
– The Ethernet port LEDs appear as shown below:

The left “Link” LED is unlit.

The right “Activity” LED is blinking orange.

Ethernet_LEDs_BlinkingAmber

You may use the AVTECH Device Discovery Utility to perform the firmware recovery. Use the latest version of the utility, which is available for download from your account at RoomAlert.com.

Follow these steps to recover your Room Alert firmware.

Step 1: Download AVTECH's Device Discovery utility and the latest firmware for your unit.

Download (1) AVTECH’s Device Discovery utility and (2) the latest firmware for your unit from your RoomAlert.com account.

This FAQ shows you how: How To Download Firmware & Software From Your RoomAlert.com Account.

Install the utility on the computer that you’ll connect your Room Alert to, but don’t open the utility yet.

Save the firmware file somewhere on your computer that you can easily find. You won’t do anything with it yet, but you’ll need to have it on hand for later.

Step 2: If you have AVTECH's Device ManageR software installed on your computer, stop the Device ManageR service.

If you have AVTECH’s Device ManageR software installed on your computer, temporarily stop the Device ManageR service as it can interfere with the firmware recovery process.

This FAQ shows you how: How To Stop, Start And Restart The Device ManageR Service.

If you’re not sure whether it’s installed or not, follow the first step of the FAQ above—if you don’t see AVTECH Device ManageR in the list of services, you’ll know it’s not installed.

Once you are done with the recovery process, you may restart the Device ManageR service.

Step 3: Set your computer at a static IP.

You’ll need to set the static IP on your computer so that it can see the Room Alert monitor once it’s connected. What static IP you set depends on your Room Alert’s network settings:

If your Room Alert is on DHCP (the default) . . .

If you’ve left your Room Alert’s network settings at the default (or just reset it to factory defaults), your Room Alert will assign itself a random 169.254.xxx.xxx address when connected to your computer. Assign your computer an IP in that range.

If your Room Alert has a static IP . . .

If your Room Alert has a static IP, assign your computer an IP in the same range and subnet as the Room Alert.

This FAQ shows you what to do whether your unit is on DHCP or has a static IP: How To Assign A Static IP Address To Your Windows Computer.

Step 4: Disable all other network cards on that computer.

Disable all other network cards on your computer, except for the one your Room Alert will be using.

This FAQ shows you how: How To Disable Network Adapters On Your Windows Computer.

Step 5: Connect your Room Alert to your computer's Ethernet port.

1. Disconnect your Room Alert Monitor from your regular network and from power.

2. Connect your Room Alert to the Ethernet port on your computer. (Ideally, you’d do this with a crossover cable, but a regular Ethernet cable will probably work as well.)

3. Do not connect the unit to power yet. You’ll do that soon, but not yet.

Step 6: Open Device Discovery, connect your Room Alert to power and follow the on-screen prompts.

1. Open Device Discovery. You may open it by navigating to StartAVTECH Device Discovery Utility.

2. Connect your Room Alert to power using the AVTECH 5V power adapter that came with the unit. The Ethernet ports on computers do not provide PoE, so you will need to use that power adapter to power the unit.

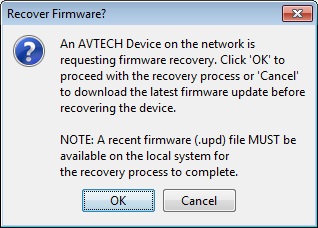
3. Device Discovery should immediately display the Recover Firmware? dialog box:

Recover_Firmware_Alert

If this prompt doesn’t appear, try power-cycling your unit. (Disconnect the power cord for your unit, wait 10 seconds, and then reconnect it.) The prompt should then appear.

4. Select OK. A page of instructions for firmware recovery will appear in your browser.

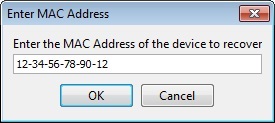
5. The Enter MAC Address dialog box should then appear.

– In the box, enter your Room Alert’s 12-character MAC Address in this format (including the hyphens): XX-XX-XX-XX-XX-XX.

You can find your MAC address printed on a sticker on the bottom of your unit.

– Then select OK.

Enter_MAC_Address_Alert

If this prompt doesn’t appear, please see the note at the end of this FAQ.

6. When the dialog box appears telling you to power-cycle your Room Alert, select OK.

Power_Cycle_Alert

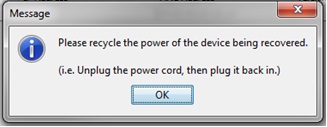
Disconnect the power cord from your unit, wait 10 seconds, and then reconnect it.

7. While your Room Alert reboots, Device Discovery displays a message at the bottom of the screen:

Waiting_for_Device_to_Reboot_Message

8. Once your Room Alert reboots, the Enter IP Address dialog box will appear as shown below:

Enter_IP_Address_Alert

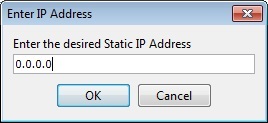
– You may enter a static IP address or enter 0.0.0.0 to use DHCP.

– Then select OK.

9. When the Saving Network Settings dialog box appears, select OK.

Saving_Network_Settings_Alert

10. Your Room Alert will reboot and appear in the list of discovered devices when AVTECH Device Discovery next scans your network.

11. Once your Room Alert has fully rebooted:

– Disconnect the Ethernet cable from the unit.

– Connect the unit normally to your network.

– Power-cycle the unit again. (Disconnect it from power, wait 10 seconds, and reconnect it to power.)

Step 7: Perform a firmware update on your Room Alert Monitor.

Update the firmware to your Room Alert unit (even if it’s already on the latest version).

This FAQ shows you how: How To Update Firmware On Room Alert Monitors.

Note

The Device Discovery utility may recover your unit without your having to go through the entire process shown above.

If you get to Step 6, but don’t see the Enter MAC Address dialog box, follow these steps:

1. Close the Device Discovery utility.

2. Disconnect your Room Alert from power and the Ethernet cable.

3. Reconnect your Room Alert to Ethernet first and then to power.

4. Open the Device Discovery utility and select Search to search for devices.

5. If your unit appears with an IP address outside your network’s range:

– Select your unit.

– Select Set IP.

– Assign a static IP address or enter 0.0.0.0 to use DHCP.

– Allow your unit to automatically reboot.

6. Double-click on your unit in Device Discovery to open its web interface and make sure it’s up and running.

7. Update your unit’s firmware. (Step 7 tells you where to get the firmware file and the instructions for performing an update.)

Facebooktwitterredditpinterestlinkedinmail
Room Alert is Made in the USA, ships worldwide from our locations in the US and EU, and has been protecting facilities since 1988.

You may find Windows Command Prompt at the following path:

  • Windows 7 & 8
    Start--> All Programs--> Accessories--> Command Prompt
  • Windows 10
    Start--> All Apps--> Windows System--> Command Prompt

To run Windows Command Prompt as an administrator:

  • Windows 7 & 8
    Right-click on Command Prompt and select Run as administrator.
  • Windows 10
    Right-click on Command Prompt, select More and then select Run as administrator.

Example Polling Method Properties saved in Orion SolarWinds:

If you are using this client, you should configure the general SNMPv3 Credentials, but leave the Read / Write SNMPv3 Credentials section blank.

Room Alert Link- Supported Firmware Updates


Current S modelsCurrent E models
Room Alert 32SRoom Alert 32E
Room Alert 12SRoom Alert 12E
Room Alert 4E
Room Alert 3E

Room Alert Manager - Compatible Devices

The latest version of Room Alert Manager supports only the devices below.

It does not support any legacy Room Alert or TemPageR models.

Current S modelsCurrent E models
Room Alert 32SRoom Alert 32E
Room Alert 12SRoom Alert 12E
Room Alert 3SRoom Alert 4E
Room Alert 3E
Room Alert 3W