Knowledge Base / Frequently Asked Questions / Device ManageR (Legacy)
In order for Device ManageR to alert you when your Axis camera detects motion, you must first configure your camera to notify Device ManageR.
Once you’ve configured your camera with a motion event, your camera will send notifications to Device ManageR over TCP port 8085 when it detects motion.
While most pages of the camera’s web interface display correctly in other browsers, some camera features that you’ll need, such as the Motion Detection window or the Video Motion Detection settings page, can’t be properly viewed or configured without Internet Explorer. (Also, it does have to be IE, not Edge.)
When you open your camera’s web interface in IE, you may get this message: ‘This webpage wants to run the following ad on: “AXIS Media Control” from “Axis Communications AB”.’ Select Allow to allow the installation.
Menu options are different in pre-v5.40 firmware than they are in v5.40 and higher; additionally, the type of motion detection you have available (built-in or Video Motion Detection) depends on your firmware version.
Follow the instructions in this FAQ to find your camera’s firmware version: Where To Find The Firmware Version Of Your Axis Camera.
The menu options in cameras with firmware version 5.40 and higher are different than those with pre-5.40 firmware. If you have 5.40+, you’ll create a Recipient. If you have firmware below 5.40, you’ll create an Event Server.
Select the tab below that corresponds to your firmware version to view the steps you should take.
1. With your camera’s web interface open to the Setup page, select Events in the navigation bar to the left.
2. In the window that opens, select Recipients.
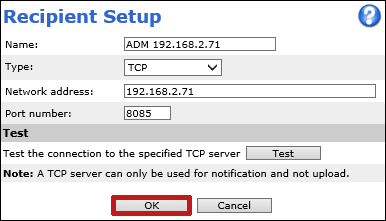
3. Select Add. Here you’re going to enter your instance of Device ManageR to receive TCP notifications:
– In Name, enter a name for your recipient. In our example, we’re entering ‘ADM 192.168.2.71.’
– In Type, select TCP from the drop-down menu.
– In Network Address, enter the IP address of Device ManageR’s host system.
– In Port Number, enter ‘8085.’
– Select Test to test the connection.
You should see a Connection successful message. Select OK to dismiss it.
If your connection test fails, you may need to open inbound TCP port 8085 in the firewall on Device ManageR’s host system.
– Finally, select OK to save your new recipient.

Your recipient will now appear in the Recipients List, and you can choose it later when you set up your Action Rule.
1. With your camera’s web interface open to the Setup page, select Event Config in the navigation bar to the left.
2. In the window that opens, select Event Servers.
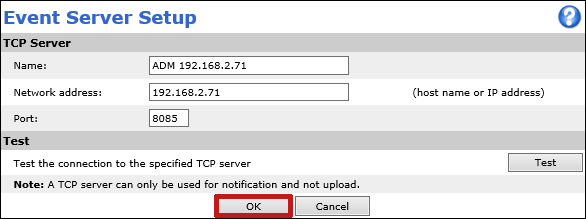
3. Select Add TCP. Here you’re going to enter your instance of Device ManageR to receive TCP notifications:
– In Name, enter a name for your event server. In our example, we’re entering ‘ADM 192.168.2.71.’
– In Network Address, enter the IP address of Device ManageR’s host system.
– In Port Number, enter ‘8085.’
– Select Test to test the connection.
You should see a Connection successful message. Select OK to dismiss it.
If your connection test fails, you may need to open inbound TCP port 8085 in the firewall on Device ManageR’s host system.
– Finally, select OK to save your new event server.

Your event server will now appear in the Event Servers List, and you can choose it later when you set up your Event Type.
Depending on the firmware version of your Axis camera, you may set up a motion event on the camera’s built-in motion detection or on the Video Motion Detection application. Note that Axis is deprecating built-in motion detection and replacing it with the Video Motion Detection application.
5.80+ has only Video Motion Detection available.* This firmware automatically installs the Video Motion Detection application on your camera and removes built-in motion detection.
*An exception to this would be if you had a motion detection event already set up on built-in motion detection and then upgraded to 5.80 or higher. In that case, you would still have built-in motion detection available; however, you would not be able to configure the Motion Detection window, which would still be removed.
5.40 to pre-5.80 can have both built-in motion detection and Video Motion Detection available. (You may manually install Video Motion Detection starting with 5.40.) Even though both built-in and Video Motion Detection may be available on the camera, you should use only one of them.
Pre-5.40 firmware has only built-in motion detection available.
You may configure Axis Video Motion Detection application settings or simply leave them at defaults. To view or configure them:
1. With your camera’s web interface open to the Setup page, navigate to Applications→Motion Detection in the navigation bar to the left.
2. In Application Settings, select Axis Video Motion Detection settings.
Settings for Video Motion Detection 3 (version 3.2) are shown here at their defaults. Your settings may differ depending on the version of Video Motion Detection you have installed.
3. Select the question mark ![]() icon in your camera’s web interface for information about the settings that are available. You may also find the Video Motion Detection manual on Axis’ website here: Axis Video Motion Detection (Axis website).
icon in your camera’s web interface for information about the settings that are available. You may also find the Video Motion Detection manual on Axis’ website here: Axis Video Motion Detection (Axis website).
4. If you make any changes, be sure to select Save.
5. Select Close to dismiss the window.
If you’re using built-in Motion Detection, you must configure a Motion Detection window in order to later set up your Action Rule or Event Type.
1. With your camera’s web interface open to the Setup page:
– Navigate to Detectors→Motion Detection in cameras with firmware versions 5.40 to pre-5.80.
or
– Navigate to Event Config→Motion Detection in cameras with firmware below 5.40.
2. When you attempt to view the Motion Detection window, you may see an error message. If you do—or if you otherwise cannot properly view the window—you’ll need to add your camera’s IP address to IE’s Compatibility View settings:
– In Internet Explorer, select Tools from IE’s menu at the top of the page.
– Then select Compatibility View settings.
– In Compatibility View Settings dialog box, type the IP address of your camera in Add this website.
– Then select Add.
– Finally, select Close to dismiss the dialog box. You should then be able to see the Motion Detection window and settings.
3. In the Motion Detection window, leave Configure Included Windows selected, which is the default.
4. In Windows Name, select New. A new ‘default window’ will appear.
5. Use your mouse to drag the window to the size and position you want it to be. In our example, we are sizing the window to match the entire image.
6. In the ‘default window’ line item, name your window. In our example, we’re calling it ‘Office Door – Motion Detection Window.’
7. Your window comes with a default Object Size (15), History (90) and Sensitivity (90). You may leave the default values, or choose your own using the slider. In our example, we’ve left the defaults for Object Size and History, but increased the Sensitivity to 95.
For more information about the features of the Motion Detection window, select the question mark ![]() icon in your camera’s web interface.
icon in your camera’s web interface.
8. Then select Save to save your motion detection window.
The menu options in cameras with firmware version 5.40 and higher are different than those with pre-5.40 firmware. If you have 5.40+, you’ll create an Action Rule. If you have firmware below 5.40, you’ll create an Event Type.
The menu options for your Action Rule in firmware versions 5.40+ also differ according to whether you’re using built-in motion detection or Video Motion Detection (VMD).
Select the tab below that corresponds to your firmware version / motion detection type to view the steps you should take.
Note that the menu options you see may differ slightly from those below, depending on your firmware version.
1. With your camera’s web interface open to the Setup page, navigate to Events→Action Rules in the navigation bar to the left.
2. In the window that appears, select Add.
3. In the General section, make sure Enable rule is selected.
4. In Name, enter a name for the rule. We’re calling ours ‘Notify ADM – Motion.’
5. In Trigger, select Applications.
6. Leave Start condition only at the default, unchecked.
7. In the drop down-menu that appears, select VMD 3 or VideoMotionDetection depending on which Video Motion Detection version you have installed. (It may already be selected for you.)
8. In Active (or Motion Detected), leave the default, Yes, selected.
9. In Schedule, select Always (No Schedule).
10. Leave Additional conditions blank, which is the default.
11. In Wait at least, enter 00:00:02.
12. In Type, select Send Notification.
13. In the drop-down menu that appears, select the recipient you made earlier.
14. In Message, enter “Motion Detected.” (This message will appear in Device ManageR’s logs and can assist with troubleshooting.)
15. Leave Send notification continuously while rule is active at the default, unchecked.
16. Then select OK to save your new rule.
Your Action Rule will now appear in your Action Rule List.
1. With your camera’s web interface open to the Setup page, navigate to Events→Action Rules in the navigation bar to the left.
2. In the window that appears, select Add.
3. In the General section, select Enable rule.
4. In Name, enter a name for the rule. We’re calling ours ‘Notify ADM – Motion.’
5. In Trigger, select Detectors.
6. Then select Motion Detection from the new drop-down menu that appears.
7. The motion window you created in the previous step should automatically get selected beneath that.
8. In Motion, ensure that Yes is selected.
9. In Schedule, select Always (No Schedule) from the drop-down menu.
10. Select Additional conditions.
11. In Wait at least, enter 00:00:02.
12. In Type, select Send Notification.
13. In the drop-down menu that appears, select the recipient you made in the previous step.
14. In Message, enter “Motion Detected.” (This message will appear in Device ManageR’s logs and can assist with troubleshooting.)
15. In Send notifications continuously while rule is active, leave the default, unchecked.
16. Then select OK to save your new rule.
Your Action Rule will now appear in your Action Rule List.
1. With your camera’s web interface open to the Setup page, navigate to Event Config→Event Types in the navigation bar to the left.
2. In the window that appears, select Add Triggered.
3. In the General section, in Name, enter a name for your event. We’re calling ours ‘Notify ADM – Motion.’
4. In priority, leave the default, Normal.
5. In Set min time interval between triggers, enter 00:00:02.
6. In Respond to Trigger, leave Always selected.
7. In Triggered by, select Motion detection.
8. In When Triggered, select Send TCP notification.
9. In Send to, select the Event Server you made in the previous step. In our example, we’re selecting ADM 192.168.2.71.
10. In Message, enter ‘Motion Detected.’ (This message will appear in Device ManageR’s logs and can assist with troubleshooting.)
11. In Send notifications continuously while event is active, leave the default, unchecked.
12. Then select OK.
Your Event Type will now appear in your Event Type List.
Once you’ve configured your Axis camera with a motion event, you may set up a motion alert in Device ManageR. Please see this FAQ for instructions: How To Configure An AXIS Camera Motion Alert In Device ManageR.

16 Cutler St, Cutler Mill
Warren, RI 02885-2761 USA
401.628.1600
888.220.6700
Info@AVTECH.com
Unit 105, Bay O
Shannon Free Zone West
Shannon, Co Clare, Ireland
+353.61.524990
EUInfo@AVTECH.com
401.628.1600
888.220.6700
Sales@AVTECH.com
Support@AVTECH.com
Sales Live Chat
Support Live Chat
Product Catalog
@AVTECHSoftware
+1.401.628.1600
Sales@AVTECH.com
Support@AVTECH.com
Sales Live Chat
Support Live Chat
Sales & Distribution Options
Product Catalog
@AVTECH_EU
We'd love to talk with you about your monitoring needs. Contact one of our Product Specialists for a free consultation.
You may find Windows Command Prompt at the following path:
To run Windows Command Prompt as an administrator:
| Current S models | Current E models |
|---|---|
| Room Alert 32S | Room Alert 32E |
| Room Alert 12S | Room Alert 12E |
| Room Alert 3S | Room Alert 4E |
| Room Alert 3E | |
| S models | E & W models |
|---|---|
| Room Alert 32S | Room Alert 32E |
| Room Alert 12S | Room Alert 12E |
| Room Alert 3S | Room Alert 4E |
| Room Alert 3E | |
| Room Alert 3W |
| Model |
|---|
| Room Alert MAX |
| Room Alert 32S |
| Room Alert 12S |
| Room Alert 3S |
| Room Alert 32E/W |
| Room Alert 12E |
| Room Alert 4E |
| Room Alert 3E |
| Room Alert 3 Wi-Fi |

